Day 9 - A Simple Background
What We're Going To Do Today:
First and foremost for today, you will need to understand DMA as I now do ALL my
loading with DMA. Second, you will need a few things:
Tools Needed for Backgrounds:
- GBA Map Editor Beta 4 - It is buggy but it works if you try several times. :).
- Gifs2Sprites - You should have this one already, we use it to convert our tiles here too.
- A Picture For The Tiles - You can use your sprite from Day 5 for the tiles set, I did.
You'll see how I did it if you don't know, later.
- CtoASM.exe - All of our tools give output in C, use my program to get the ASM.
Please redownload CtoASM.exe to get the latest.
- That's all you need as we're just doing a background, lotta drawing but not much
coding.
Doing a Background isn't actually that hard as it might seem from reading the
tutorial at ThePernProject. Just 3 loads
and setting 2 registers and boom, instant background. In the next section we'll prepare
our tileset.
Preparing a Tile Set
To prepare our tileset (i.e. The tiles that make up a map/background) we will just
use the .Gif File we used in Day 5 or you could draw your own tileset in MS Paint. Run
GBA Map Editor. In the Tool window that looks like this:
 Click the Tiles menu and choose "Load Tiles". You should get the Open Dialog
like so:
Click the Tiles menu and choose "Load Tiles". You should get the Open Dialog
like so:
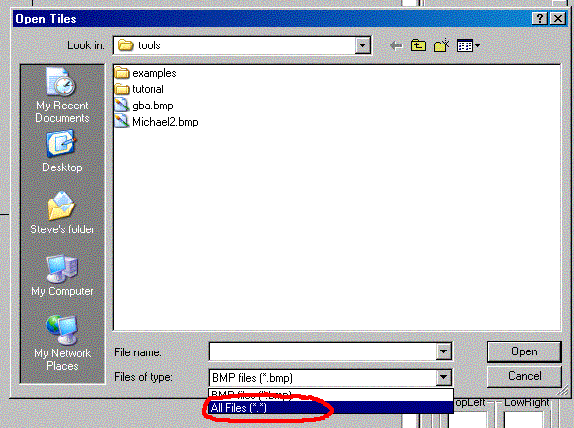 Since we have a Gif file, you need to go and change the view to All Files like
I have circled to be able to load it. Do so and open the Gif. You should see the picture
in the Tool window in a scrollable frame called Choose Tile. You'll notice that there is
a little red square in the Choose Tile frame. Click anywhere on the picture and the red
square will move to that tile. You can also tell which tile you've selected by looking
lower in the Tool window under Selected Tile.
Now we'll make our map. In the larger window, open the File menu and click "New".
A window called Map Properties will pop up. Type in under Map Name "simple", because this
map is going to be simple as we just want to learn how to do a map right now so we don't
need anything fancy. Make sure 256x256 is selected under Map Size and hit the OK button
at the bottom of the window.
Next Section: Draw the Map!
Since we have a Gif file, you need to go and change the view to All Files like
I have circled to be able to load it. Do so and open the Gif. You should see the picture
in the Tool window in a scrollable frame called Choose Tile. You'll notice that there is
a little red square in the Choose Tile frame. Click anywhere on the picture and the red
square will move to that tile. You can also tell which tile you've selected by looking
lower in the Tool window under Selected Tile.
Now we'll make our map. In the larger window, open the File menu and click "New".
A window called Map Properties will pop up. Type in under Map Name "simple", because this
map is going to be simple as we just want to learn how to do a map right now so we don't
need anything fancy. Make sure 256x256 is selected under Map Size and hit the OK button
at the bottom of the window.
Next Section: Draw the Map!
Creating The Map
You might have noticed the Block Select option in the Tool window and think
it is best to use. As I have said before GBA Map Editor beta 4 is EXTREMELY BUGGY. When
I use Block Select the map ends up sheared when it finally runs. The map will not get
sheared however if you go to the Tools menu of the large window and put the mouse over
"Tile Size" and click "16x16". Now the red selecting square is 4 times as big which isn't
as good as if Block Select was working but it's good enough for now. Draw a Map in the
big black square/rectangle/whatever in the large window. It doesn't have to be fancy, but
I spent a good five minutes to make a smile face out of the smile face GIF we used as a
sprite in Day 5. Here's how my large window looks:
 Let's save the map incase the editor glitches and doesn't export our map correctly.
open the File menu and click "Save". Save as "simple.map". Good.
Now we'll export our map to C, goto the File menu in the large window and put
the mouse over Tools and choose "Export to C". A Save dialog will come up. Save as
"simple.c". Now before you close the map editor, go look at the size of simple.c. If
simple.c is less than 5 kb then map editor glitched (I'd say this happens 50% of the time).
If map editor glitched either keep trying or close and run map editor again, going File
-> Load and opening your map and reExporting it to C until it does it right.
Another way to tell is opening simple.c. You see that on the first line of the
file, it says somewhere "32 * 32"? Well, that means there should be 32 rows and 32 columns
of numbers. Just check the lines of numbers down. Many times there'll only be 17 which is
wrong. Redo it if it is wrong with the method in the previous paragraph.
Let's save the map incase the editor glitches and doesn't export our map correctly.
open the File menu and click "Save". Save as "simple.map". Good.
Now we'll export our map to C, goto the File menu in the large window and put
the mouse over Tools and choose "Export to C". A Save dialog will come up. Save as
"simple.c". Now before you close the map editor, go look at the size of simple.c. If
simple.c is less than 5 kb then map editor glitched (I'd say this happens 50% of the time).
If map editor glitched either keep trying or close and run map editor again, going File
-> Load and opening your map and reExporting it to C until it does it right.
Another way to tell is opening simple.c. You see that on the first line of the
file, it says somewhere "32 * 32"? Well, that means there should be 32 rows and 32 columns
of numbers. Just check the lines of numbers down. Many times there'll only be 17 which is
wrong. Redo it if it is wrong with the method in the previous paragraph.
Converting The Gif To A C File Again
Do the same thing over again this time with 256 colors instead of 16. Assuming that
your file name is "sprit.gif" here's the command line that you type:
Gifs2sprites 256 sprit.h sprit.gif
notice that the C Header to create comes first and THEN the gif(s). You should end up with
"sprit.h" .
So now you have:
Files We've Made So Far:
- sprit.gif - The picture you used for everything.
- simple.map - The map file incase you want to edit it later in the editor.
- simple.h - The C Code for the tile numbers for the map.
- sprit.h - The C Code for the sprit bitmap we used for tiles.
- Now we need to convert the C code to Assembly to be able to use it!
Converting to Assembly
Make sure you have the two(2) .h files and CtoASM.exe in the same folder and
run CtoASM.exe. Type "simple.h" in the top box and "simple.asm" in the second box. Hit
the GO button. You should get a "simple.asm" file, good. Now close CtoASM. Is it closed?
Good. Now run it again. I have you run it again because I have only tested it with one file
per run and I don't know the stability of doing consecutive file conversions with the same
instance. Type in the first box "sprit.h" and "sprit.asm" in the second. Hit GO. You should
now have a "sprit.asm" file, good. Everything's good so far I hope.
I hope my Windows (I love XP, I haven't been able to crash it, yet :) ) program comes
in handy during your assembly coding quest.
Registers We Need To Know About
There are really 2 registers we actually need to know about. I'll start with the
easier one, REG_DISPCNT. Yep the same register that controls screen mode. In it we need to
enable BackGround number 2. If you'll notice we've always been doing that so that's not a
problem, that's why I said it's easy! The other thing is that we'll be useing Mode 1 today
instead of Mode 3, so we'll get (MODE_1|BG2_ENABLE) for what we load REG_DISPCNT with.
The other register, REG_BG2CNT, is a little more tricky. First if you want to use
a different background, enable it in the screen mode register and then replace the '2' in
REG_BG2CNT with the background number. REG_BG2CNT needs alot of information, for our purposes
(being a basic background) we need to load it with 4 pieces of info. Here they are:
Info Needed In REG_BG2ENABLE
For A 256 Color, 256x256 Rotation Background
- Size - Will be ROTBG_SIZE_256x256 .
- Color - Will be BG_COLOR_256. Rotation backgrounds can't use 16.
- Screen Base Block - Where you are going to put map data. Look at the
Background tutorial at ThePernProject for more
info on the Screen and Char Base Blocks than I give here.
- Char Base Block - Where you put the actual tile bitmaps.
There are 4 Char Base Blocks and 32 Screen Base Blocks, but these all overlap so you want
to put the map data in a Screen Block that isn't in the middle of your chosen Char Block.
All of these Blocks are in VRAM, that's why we can't use a bitmap mode like 3 for Backgrounds
or we'll end up with garbage on the screen.
Getting Coding!
Let's get coding! As usual I'll give the code in chunks and then explain it.
Also as usual my comments in the code will possible be more explaination than necessary.
Download the background header file, backg.h, now.
The first chunk:
;;--- CODE START ---;;
@include screen.h ; always want to use our helper stuff
@include dma.h ; need this for our DMA loads
@include backg.h ; has special stuff just for our backgrounds
b start ; jump over our background and tile data
@include simple.asm ; our map data, under the label objB0 (that's a zero, not big 'oh')
@include sprit.asm ; our tile data, under the label obj .
start ; a label ofcourse
;set the screen mode and enable background 2
ldr r1,=REG_DISPCNT
ldr r2,=(MODE_1|BG2_ENABLE)
str r2,[r1] ; notice that the SToRe instruction stores the First in the Second
; unlike the LoaD Register that puts the Second in the First.
; give the background control register it's info
ldr r1,=REG_BG2CNT
ldr r2,=(ROTBG_SIZE_256x256|BG_COLOR_256|(28<<SCREEN_SHIFT))
str r2,[r1]
;;--- STOP COPYING ---;;
You may be wondering about that last LDR instruction, we're we have a part like
this: (28<<SCREEN_SHIFT). SCREEN_SHIFT is defined in backg.h and we shift the 28 over in
REG_BG2CNT to the right place in the register for the Screen Base Block number. You can
also see from this that we use 28 as our Screen Block and 0 (zero) for our Char Block. We
don't actually put the zero in there, but by default it's 0 (zero) so why bother. I think
Screen Block 28 is a little far from Char Block 0 in memory but as long as they don't overlap
we should be fine. Here's our loads for map and tile bitmap data:
;;--- CODE CONTINUE ---;;
;now we'll load our tile data with DMA
ldr r1,=REG_DMA3SAD ; \
ldr r2,=obj ; - Source address is obj, defined in sprit.asm
str r2,[r1] ; /
ldr r1,=REG_DMA3DAD ; \
LoadCharBlockAddr r2, 0 ; - Helper macro, load r2 with address of Char Block #0
str r2,[r1] ; which is our destination address for this DMA transfer.
ldr r1,=REG_DMA3CNT ; \
ldr r2,=(8192|DMA_32NOW) ; - transfer 8192 32bit chunks of tile bitmaps into Char Block 0.
str r2,[r1] ; /
;------------------------------divider to make reading easier
ldr r1,=REG_DMA3SAD ; \
ldr r2,=objB0 ; - Source address is objB0, defined in simple.asm
str r2,[r1] ; /
ldr r1,=REG_DMA3DAD ; \
LoadScreenBlockAddr r2, 28 ; - Helper macro, load r2 with address of Screen Block #28
str r2,[r1] ; which is our destination address for this DMA transfer.
ldr r1,=REG_DMA3CNT ; \
ldr r2,=(512|DMA_32NOW) ; - transfer 512 32bit chunks of map data into Screen Block 28.
str r2,[r1] ; /
;;--- STOP COPYING ---;;
Note that comments start with a semi-color ';' and are ignored by Goldroad, couldn't remember
if I told you what comments are before so there. :) .
Now I'd like to explain some of the math behind how I know how many chunks to transfer.
For the first one, it is a 32x32 image. That's 1024, multiply that by 32 which is the number of
bytes in a tile. You get 32768, that's chunks of 8bits. Divide by 4 to get 8192 which is how
many 32bit chunks we need to transfer. I don't remember how I got 512 for the second one.
sorry. :( . But it works. :) . Now I said there were 3 loads, remember?
The 3rd is the pallete, it goes into VPAL which comes before the sprite pallete in
memory (0x5000000). Since the pallete load and the infinite loop are the last
pieces of code, this will be the final code chunk to make up the Day 9 code.
Here goes:
;;--- CODE CONTINUE ---;;
ldr r1,=REG_DMA3SAD ; \
ldr r2,=pallete ; - Source address is pallete, defined in sprit.asm
str r2,[r1] ; /
ldr r1,=REG_DMA3DAD ; \
ldr r2,=VPAL ; - Our destination address is VPAL (Background and MODE 4 pallete)
str r2,[r1] ; /
ldr r1,=REG_DMA3CNT ; \
ldr r2,=(128|DMA_32NOW) ; - transfer 128 32bit chunks of pallete to VPAL.
str r2,[r1] ; / I think all pallete transfers are 128 32bit chunks as
; the palletes are 256 16bit entries.
infin ;\
b infin ; - our infinite loop
;;--- CODE STOP/ STOP COPYING ---;;
That's it, assemble and run your code!
This Day In Review
I don't know what to say other than this took me a total of two weekdays to
complete vs. one weekend day for most of my other works and that I hope you liked today's
content.
Intro - Day 10
Patater GBAGuy Mirror
Contact